How can we help?
Schedule update utilities
In some instances, scheduled transactions must be updated to match changes in your clients’ deposits or spending. To do this quickly, use Scheduled Deposits Update or Scheduled Payments Update in the Utilities section of the ribbon menu.
Video instructions for this process can be viewed below.
Video
This video will show how to automatically change a group of scheduled deposits or payments.
Updating scheduled deposits
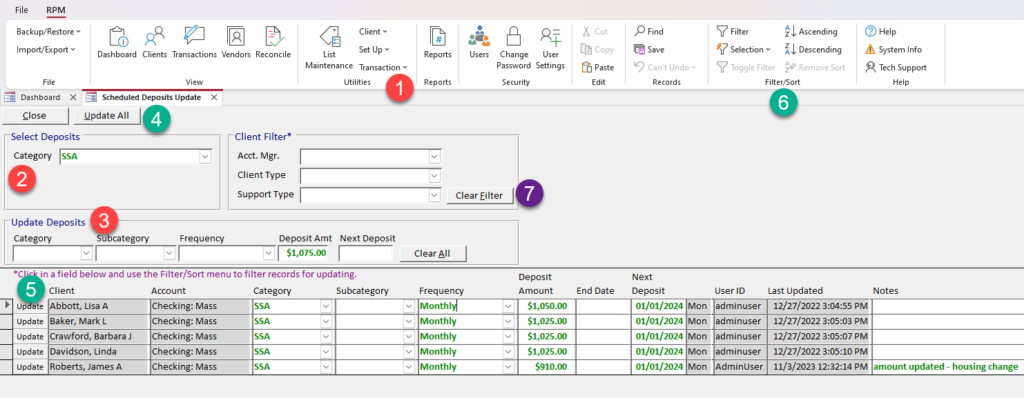
- Navigate to the Utilities section of the ribbon menu, click Transaction, then select Scheduled Deposits Update.
- Use filters to find the scheduled deposits you would like to change.
- To filter your existing scheduled deposits by deposit category, look in the “Select Deposits” section of the screen and select a deposit category from the dropdown list.
- To filter your existing scheduled deposits by account manager, client type, or support type, look in the “Client Filter” section of the screen and select your desired filters from one or more of the dropdown lists.
- Enter the new deposit information in the “Update Deposits” section of the screen. You can choose to update one or more of the following fields: category, subcategory, frequency, deposit amount, and next deposit date.
- To update all the existing deposits with the new information, click the Update All button at the top of the screen.
- To update existing deposits one at a time with the new information, click the Update button to the left of any list item.
- To update specific groups of deposits that could not be filtered by category, account manager, client type, or support type, use the Filter/Sort options in the ribbon menu. This feature allows you to find existing scheduled deposits with a certain amount, frequency, subcategory, next deposit date, end date, client, or account.
- To remove a filter, click the Clear Filter button or close and reopen the Scheduled Deposits Update screen.

Updating scheduled payments
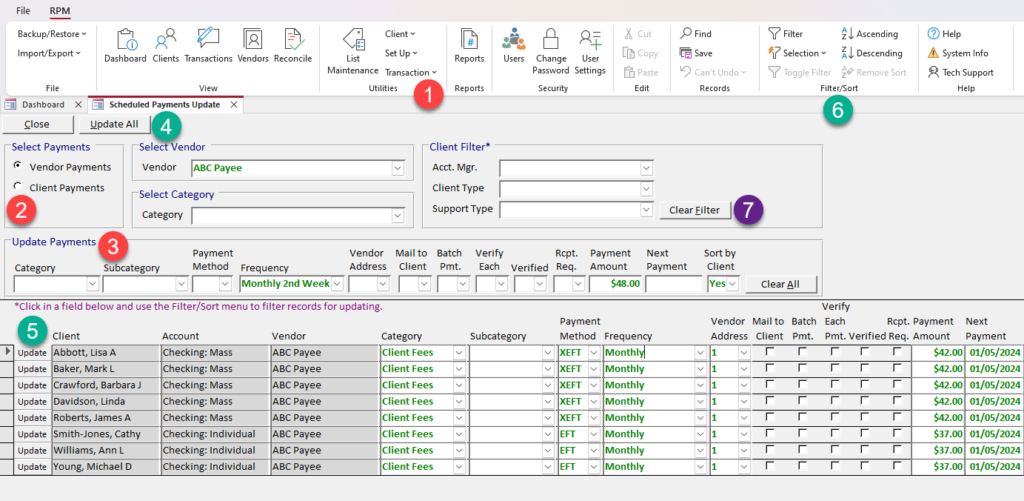
- Navigate to the Utilities section of the ribbon menu, click Transaction, then select Scheduled Payments Update.
- Use filters to find the scheduled deposits you would like to change.
- In the “Select Payments” section of the screen, select one of these options:
- Vendor Payments—select to filter existing scheduled payments being made to vendors
- To filter payments made to a certain vendor, select that vendor from the dropdown list in the “Select Vendor” section of the screen.
- Client Payments—select to filter existing scheduled payments being made to clients
- Vendor Payments—select to filter existing scheduled payments being made to vendors
- To filter your existing scheduled payments by payment/deposit category, look in the “Select Category” section of the screen and select a payment/deposit category from the dropdown list.
- To filter your existing scheduled payments by account manager, client type, or support type, look in the “Client Filter” section of the screen and select your desired filters from one or more of the dropdown lists.
- In the “Select Payments” section of the screen, select one of these options:
- Enter the new payment information in the “Update Deposits” section of the screen. You can choose to update one or more of the following fields: category, subcategory, payment method, frequency, vendor address, mail to client, batch payment, verify each, verified, receipt required, payment amount, next payment date, and sort by client.
- To update all the existing payments with the new information, click the Update All button at the top of the screen.
- To update existing payments one at a time with the new information, click the Update button to the left of any list item.
- To update specific groups of payments that could not be filtered by category, account manager, client type, or support type, use the Filter/Sort options in the ribbon menu. This feature allows you to find existing scheduled payments with a certain payment method, amount, frequency, subcategory, next payment date, end date, client, vendor, or account.
- To remove a filter, click the Clear Filter button or close and reopen the Scheduled Payments Update screen.

