Entering transactions manually
To enter transactions manually for clients, use the Transactions screen in the View section of the ribbon menu.
There are three options: Enter Payment, Enter Deposit, and Enter Transfer.
Enter payment
To enter a one-time payment for a client, follow these steps:
- In the “Client” field, type or select a client’s name.
- In the “Account” field, type or select the client’s account to be used for the payment.
- Use the “Pay To” radio buttons to select whether this payment will be paid to the client, a vendor, or a one-time vendor.
- Select a payment category. Optionally, also select a subcategory.
- If the payment will be paid to a vendor, type or select the vendor in the “Pay To” field on the check.
- If the payment will be paid to a vendor, select the vendor address.
- Type or select a date for the payment.
- Enter the monetary amount of the payment.
- Select your desired payment method. For information about payment methods, see the Payment methods page.
- Check “Batch Payment” if you want to print multiple transactions on a single check or export multiple transactions as a single XEFT.
- Check “Receipt Required” if you need a receipt for this payment.
- Optional: Enter a description for a document associated with the payment.
- Optional: Select the document link type.
- Optional: Select the document file location. For information about attaching document links, see the Attaching documents page.
Tip: Payment categories and subcategories can be configured on the List Maintenance screen.

When you are finished, click Close. The payment will save automatically. View it in the Transactions screen.
Video walkthrough
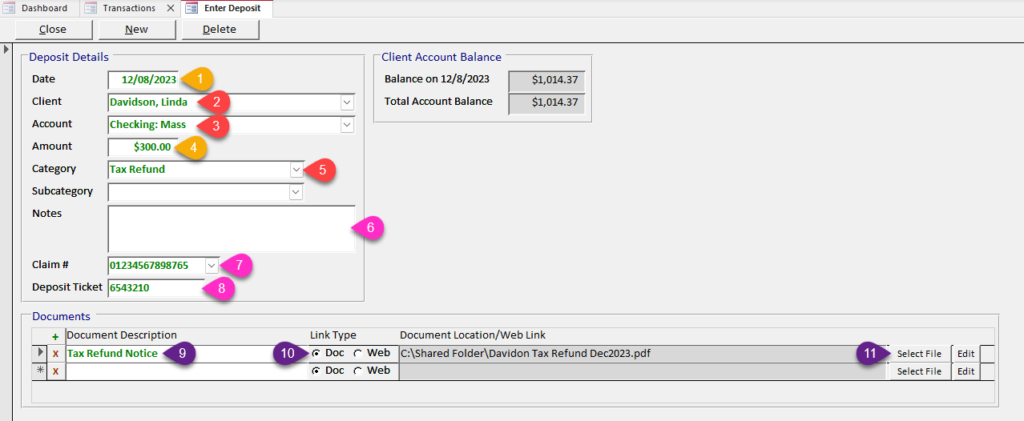
Enter deposit
To enter a one-time deposit for a client, follow these steps:
- Type or select a date for the deposit.
- In the “Client” field, type or select a client’s name.
- In the “Account” field, type or select the client’s account to be used for the deposit.
- Enter the monetary amount of the deposit.
- Select a deposit category. Optionally, also select a subcategory.
- Optional: Enter deposit notes.
- Optional: Enter the claim number associated with the deposit. Claim numbers can be added in the Clients screen.
- Optional: Enter the deposit ticket number associated with the deposit.
- Optional: Enter a description for a document associated with the deposit.
- Optional: Select the document link type.
- Optional: Select the document file location. For information about attaching document links, see the Attaching documents page.
Tip: Deposit categories and subcategories can be configured on the List Maintenance screen.
When you are finished, click Close. The deposit will save automatically. View it in the Transactions screen.
Video walkthrough
Enter transfer
To enter a transfer between clients, accounts, or categories/subcategories, follow these steps:
- In the “Payment From Client” field, type or select a client’s name.
- In the “Payment From Account” field, type or select the account out of which the funds will transfer. The selected “from” client’s default account will fill in automatically, but you can change it.
- In the ” Deposit To Client” field, type or select a client’s name. To transfer to another account owned by the same client, select the same client’s name.
- In the “Deposit To Account” field, type or select the account to which the funds will transfer. The selected “to” client’s default account will fill in automatically, but you can change it.
- Select a “from” category. Optionally, also select a “from” subcategory. For transfers between different accounts held by the same client, the category defaults to “Xfer,” but you can change it. Subcategories cannot be used for these transfers.
- Select a “to” category. Optionally, also select a “to” subcategory. For transfers between different accounts held by the same client, the category defaults to “Xfer,” but you can change it. Subcategories cannot be used for these transfers.
- Type or select a date for the transfer.
- Enter the monetary amount of the transfer.
- If the transfer is between different accounts and you wish to export it to an XEFT file, change the payment method to “Export Transfer.”
- Optional: Enter transfer notes. Information about the transfer will populate this field automatically, but you can add to or alter it.
- Optional: Enter a description for a document associated with the transfer.
- Optional: Select the document link type.
- Optional: Select the document file location. For information about attaching document links, see the Attaching documents page.
Tip: Transfer categories (for which you can use payment categories) and subcategories can be configured on the List Maintenance screen.

When you are finished, click Close. Both a “Transfer Out” transaction and a “Transfer In” transaction will save automatically. View them on the Transactions screen.