How can we help?
Updating client information
Instead of searching through the Clients screen to update client status values and thresholds for clients one at a time, we’ve made it easy to do this all at once on a single screen.
Meet the Client Information Update screen! Use this to quickly update values shared by a group of clients, including account managers, client types and support types, and balance minimums and limits.
Follow along below to learn how to update client information.
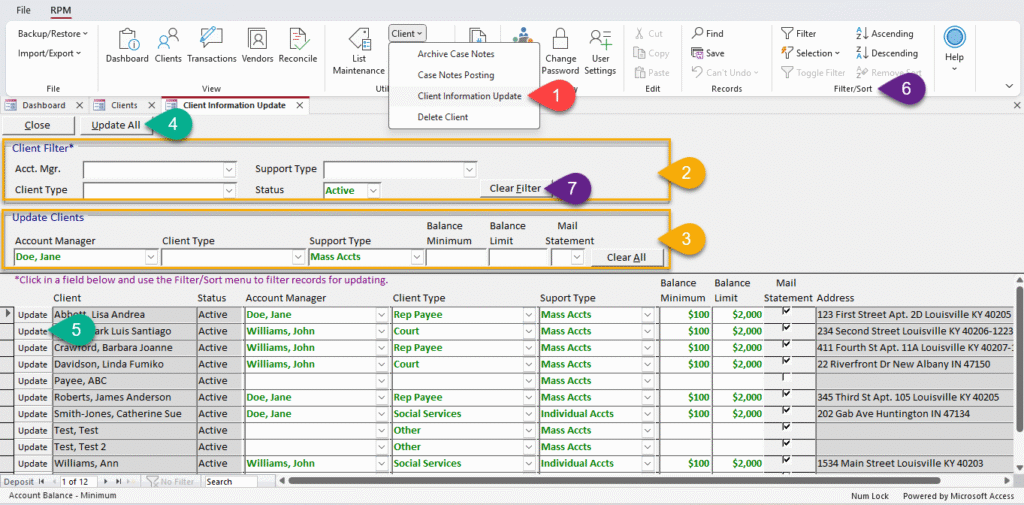
- Navigate to the Utilities section of the ribbon menu, click Client, then select Client Information Update.
- Use filters to find the client records you would like to change. To filter clients by account manager, client type, support type, or status, look in the “Client Filter” section of the screen and select your desired filters from one or more of the dropdown lists.
- Enter the new client information in the “Update Clients” section of the screen. You can choose to update one or more of the following fields: account manager, client type, support type, balance minimum, balance limit, and “mail statement” flag.
- To update all currently displayed clients with the new information, click the Update All button at the top of the screen.
- To update clients one at a time with the new information, click the Update button to the left of any list item.
- To update specific groups of clients that could not be filtered by account manager, client type, support type, or status, use the Filter/Sort options in the ribbon menu. More details about using Filter/Sort can be found in our Finding, filtering, and sorting article.
- To remove a filter, click the Clear Filter button or close and reopen the Client Information Update screen.
For an instructional video pertaining to similar update screens, see our Scheduling utilities – Updating transactions article.