Client fees
In general, the best way to handle payee fees is to enter your company in RPM as a vendor, then make a fee payment from all clients to that vendor.
The specifics of how to set this up depend on whether you charge a flat fee or a fee based on the clients’ total deposits over a date range. After setting up your company as a vendor in RPM, navigate to the section below that matches your client fee method, then follow the steps.
Enter your company as a vendor
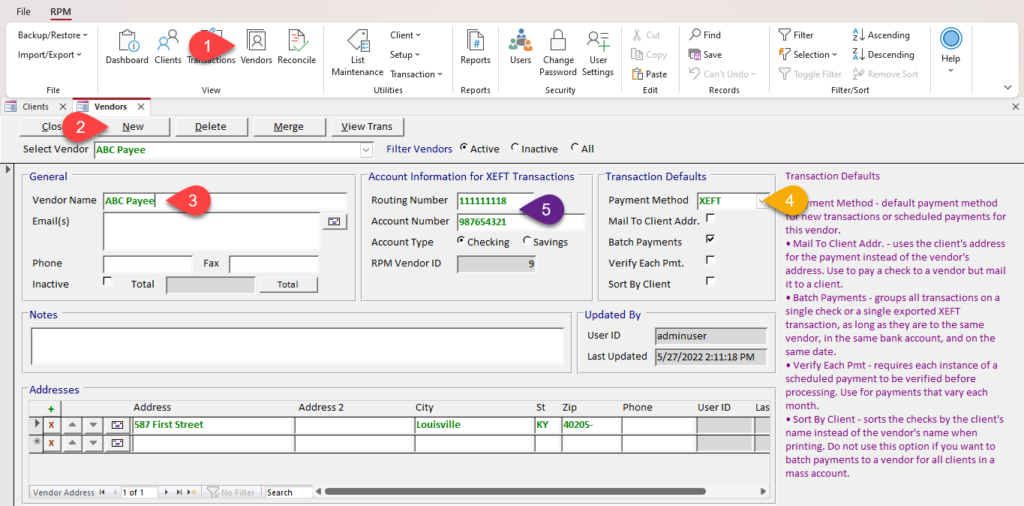
First, set up your own company as a vendor in RPM.
- Open the Vendors screen.
- Click New.
- Enter your company name in the “Vendor Name” field.
- In the “Transaction Defaults” section of the screen, select a default payment method. If you want to receive a batch check for the payee fees, select “Print”; if you want the fees to be transferred to your account electronically, select “XEFT.”*
- If you’re using the “XEFT” payment method, enter your routing and account number information.

Once this is done, close the Vendors screen to save your changes, then follow the steps below based on the type of client fees you charge.
*If your company is already a vendor in RPM, see our instructions for how to update existing vendors’ defaults.
Flat fee
If you charge your clients a flat fee (for example, $50 every month for every client), schedule these fee payments using the Create Scheduled Payments utility.
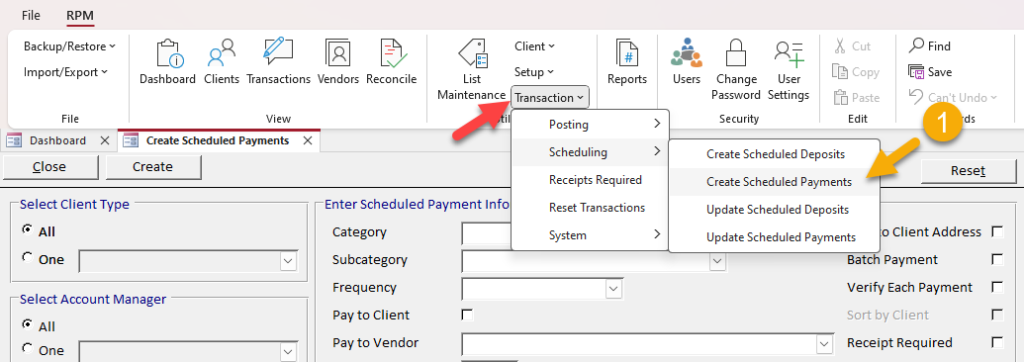
- From Utilities > Transaction > Scheduling in the menu, open the Create Scheduled Payments screen.
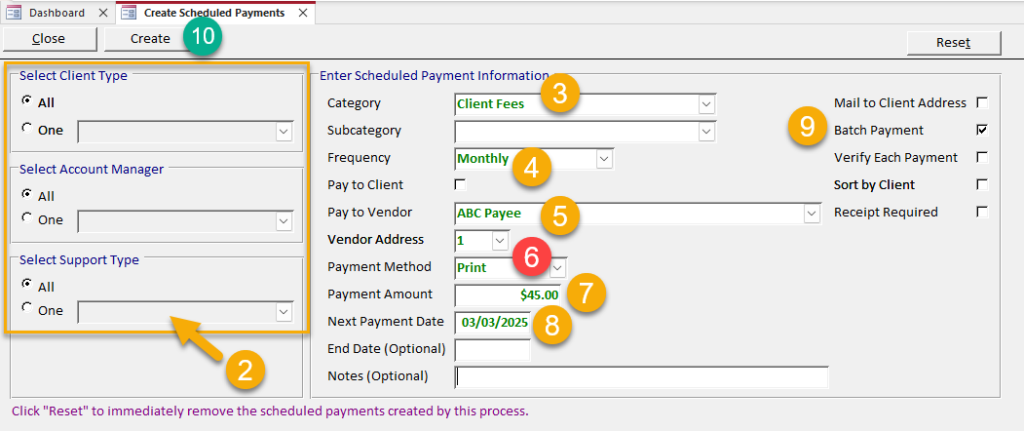
- Ensure that the appropriate client type, account manager, and support type are selected for all clients that will be paying payee fees. If this is all your clients, leave the selections as “All.”
- Enter the payment category. If you don’t already have a payee fee category, you can set one up in List Maintenance.
- Enter the payment frequency.
- In the “Pay to Vendor” field, select your company.
- In the “Payment Method” field, select either “Print” (if you want a batch check) or “XEFT” (if you want the funds electronically transferred). This should default based on the payment method you chose when entering your company as a vendor.
- Enter the payment amount.
- Enter the next payment date that the fee payments will be made.
- Ensure the “Batch Payment” box is checked. This will make it so that you will receive either a batch check or a batch XEFT for the payments instead of individual payments from each client.
- Click Create.


Once this is done, the payee fee payments will appear on your dashboard to be processed on the payment date you selected and recur according to your selected frequency. Process them like normal payments.
If you need to update the fee amount, use the Update Scheduled Payments utility.
Percentage-based fee
If you charge client fees based on a percentage of clients’ deposits, follow these steps to set up the fee payments.
- Open the Client Fee Posting screen under Utilities > Transaction > Posting in the ribbon menu.
- Enter the percentage of a client’s deposits that you will charge for your fee in the “Fee % of Deposits” field.
- Enter a maximum fee amount. If you do not set a maximum fee, enter zero in this field.
- Enter a date range over which your fees will be calculated. This is usually a calendar month.
- Enter the transaction date for the client fee transaction (in other words, the date the clients will be charged their fees).
- Enter your own company in the “Pay to Vendor” field.
- If applicable, select the correct address.
- Enter the payment category and, if you wish, subcategory. If you don’t already have a category for client fees, you can set one up in List Maintenance.
- In the “Payment Method” field, select either “Print” (if you want a batch check) or “XEFT” (if you want the funds electronically transferred). This should default based on the payment method you chose when entering your company as a vendor.
- Optional: Enter a memo.
- To create one batch payment (rather than individual transactions for each client), check the “Batch Payment” box.
- Click Post.
A report will open confirming the fee amounts. To continue, click Yes.

Once this is done, the payee fee payments will be posted and can be viewed on the Transactions screen.
Repeat this process when the client fees are next due.
Trouble with percentage-based fee?
If your percentage-based fee doesn’t seem to be applying correctly to some or all of your clients, check to make sure the “Apply Fee” flags are checked for the appropriate client types and deposit categories.
To do this, navigate to List Maintenance and open both the “Client Type” list and the “Deposit Category” list, as shown below.
In order for a client to make fee payments, the “Apply Fee” option for their client type must be checked. In order for a type of deposit to be included in the fee calculation, the “Apply Fee” option for that deposit category also must be checked.


If you have made a mistake and want to reset the client fee transactions to redo them, click the Reset button at the top of the Client Fee Posting screen or use the Reset Transactions screen in the Utilities > Transaction section of the ribbon menu.
