Reconciliation
Reconciliation allows you to confirm that the transactions you’ve processed in RPM have cleared the bank. Follow the steps below to complete reconciliation for each of your bank accounts.
Note: This article applies to the most recent versions of RPM (6.0.9 and 6.1.0). For reconciliation in previous versions, see the Legacy reconciliation article.
Basics
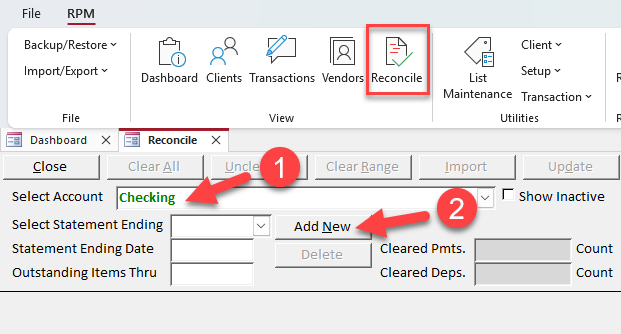
- When you first open the Reconcile screen before beginning any statements, your default mass account (or your first alphabetical individual account) will be selected. Ensure the correct account is selected that you wish to reconcile.
- Click Add New to begin a new reconciliation for this account.
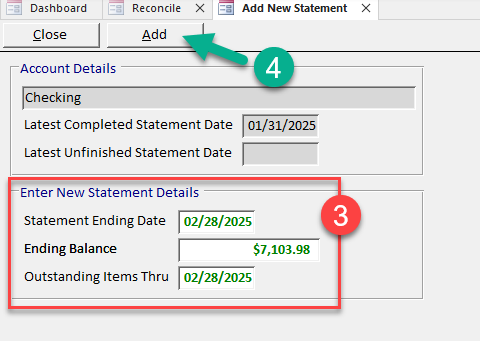
- On the Add New Statement screen, enter the details for this new statement, including the ending date from your bank statement, the ending balance, and the “Outstanding Items Thru” date (which defaults to the same date as the ending date).
- Click Add to create a new statement with the specified details.
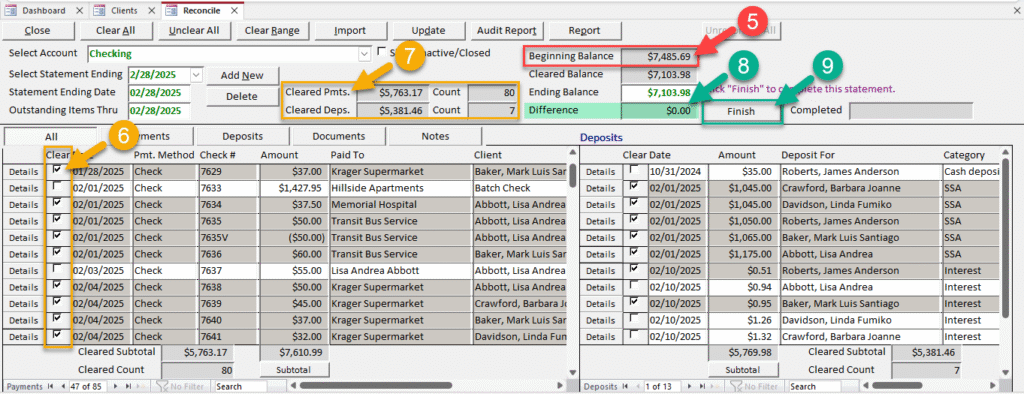
- Before clearing transactions, first verify the beginning balance in RPM matches the beginning balance on your bank statement. If it does not, then something was completed incorrectly or changed later in a previous month’s reconciliation. See the Beginning balance doesn’t match? section below for instructions. If the beginning balance does match your bank statement, proceed with the reconciliation.
- Initially, the cleared subtotals and cleared counts for payments and deposits will be zero. To begin reconciling transactions, check the Clear box next to payments and deposits that have cleared on your bank statement. (For quicker ways to clear transactions, see the Clearing shortcuts section below).
- Continue clearing transactions until the cleared subtotals and cleared counts on the screen match the totals and transaction numbers from your bank statement.
- Finally, confirm that the cleared balance matches the ending balance and that the difference is zero.
- Click Finish to complete this reconciliation. A report will display. This can be printed or saved right away, or you can view it again later in Reports.
Clearing shortcuts
In addition to checking the “Clear” box individually for the transactions you’re reconciling, you can use one or more of the following shortcuts to save you time.
Clear/Unclear All
Use Clear All to automatically clear all the transactions on this statement, including both payments and deposits. Once all transactions are cleared, transactions can be individually un-cleared with the checkbox if they do not appear on the bank statement.
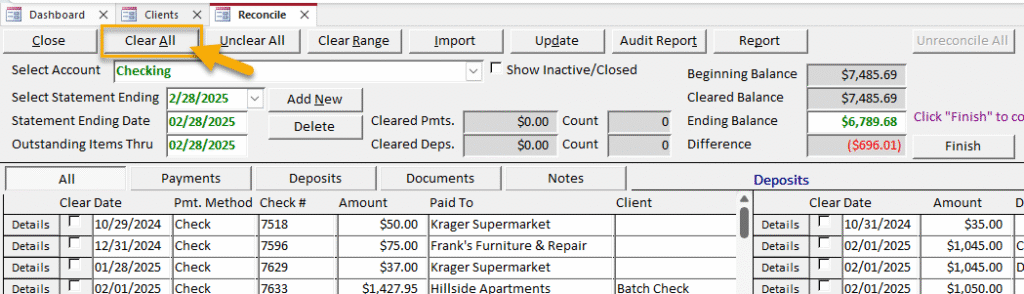
To start over on a statement in progress and remove the “Cleared” flag on all transactions, use Unclear All.
Note: On previously completed statements, Unclear All will NOT remove any reconciled items. Use the Unreconcile All button to remove reconciled items when editing a completed statement.
Clear Range
Click Clear Range to mark a range of transactions as cleared. Select the “Transaction Type” (which includes an option for deposits) and then select the range of check numbers or transaction dates. Click Update to update the selected range.
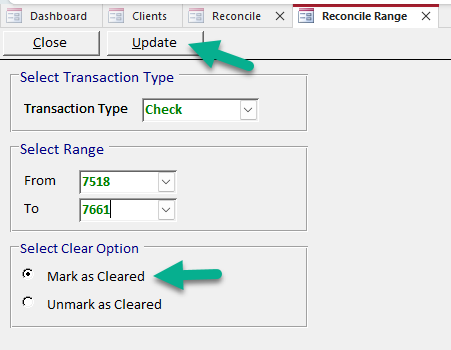
For example, if you know all checks between numbers 7518 and 7661 have cleared the bank, you can use the Reconcile Range option as shown above to automatically mark all these checks as cleared on your statement.
This button can also be used to unclear a range of cleared transactions using the “Unmark as Cleared” selection option.
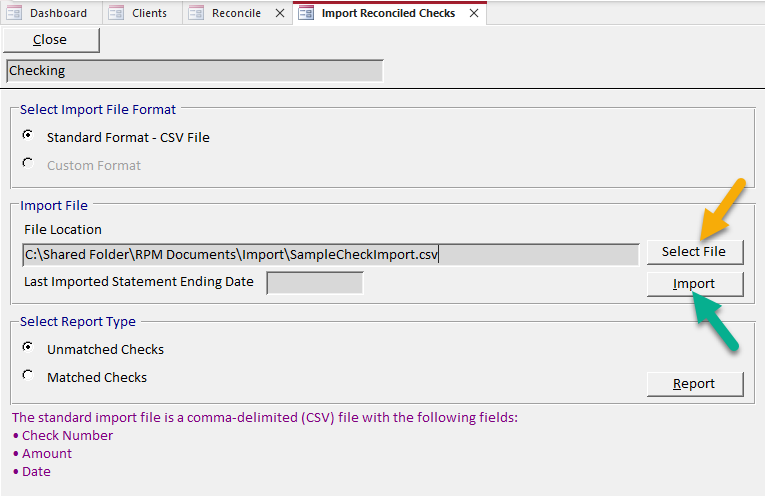
Import
Click Import to import and reconcile a list of cleared checks. To do this, you will need a CSV file from your bank containing the following information:
- Check number
- Amount
- Date
Once the file has been selected from your file storage, click Import to import it into RPM. Checks in the import file that match the check number and amount on the Reconcile screen will be automatically marked as cleared.
Use the Unmatched Checks report to see any checks in the file that do not match checks on this reconciliation. The Matched Checks report will show the checks that match and have been marked as cleared.
Video walkthrough
IMPORTANT: The video below shows the reconciliation screen from version 6.0.8. An updated video is coming soon!
Beginning balance doesn’t match?
If the beginning balance on the Reconcile screen does not match the beginning balance on your bank statement, you may not be able to reconcile the current month.
The “Beginning Balance” shows the total value of items reconciled prior to this statement. This should match the beginning balance on your bank statement. If it does not match, verify that previous reconciliations are correct.
On the Reports screen, use Reconciliation > Account Statement List to view reconciliation totals for previous statements. If a previous statement was completed incorrectly, select that completed statement ending date on the Reconcile screen and use the Edit button to correct it.
If you suspect changes have already been made to a previously completed reconciliation, click Audit at the top of the screen to display a report of all audit events pertaining to the statement currently displayed. (If you are using an older version of RPM, access this report on the Reports screen via Audit > Audit Events By Statement.)
For additional assistance correcting previous reconciliations, contact us.